Installation Guide
Wildfire is a powerful instant messaging (IM) and chat server that implements the XMPP protocol. This document will guide you through installing Wildfire. For a full list of features and more information, please visit the Wildfire website: http://www.igniterealtime.org/projects/wildfire/
Installation
Windows
Run the Wildfire installer. The application will be installed to c:\Program Files\Wildfire by default.Linux/Unix
Choose either the RPM or tar.gz build. If using the RPM, run it using your package manager to install Wildfire to /opt/wildfire:rpm -ivh wildfire_3_0_0.rpm
If using the .tar.gz, extract the archive to /opt or /usr/bin:tar -xzvf wildfire_3_0_0.tar.gz
mv wildfire /opt
Note: the .tar.gz build does not contain a bundled Java runtime (JRE). Therefore, you must have JDK or JRE 1.5.0 (Java 5) or later installed on your system. You can check your java version by typing "java -version" at the command line and (if necessary) upgrade your Java installation by visiting http://java.sun.com.
Setup Overview
To complete the installation of Wildfire, you'll need to perform each of the following steps:
- Database - if you choose to use an external database, you must prepare your database for Wildfire.
- Setup - Use the built-in web-based setup tool to setup and verify the server configuration.
- Admin Console - use the web-based admin tool to manage the server.
This document also includes information on:
Files in the Distribution
The files in your distribution should be as follows (some sub-directories omitted for brevity):
wildfire/
 |- readme.html
 |- license.html
 |- conf/
 |- bin/
 |- jre/
 |- lib/
 |- plugins/
     |- admin/
 |- resources/
     |-database/
     |-security/
 |- documentation/
- The conf directory is where Wildfire stores configuration files.
- The bin directory contains the server executables. Depending on which distribution you installed, different executables will be available.
- The jre directory contains a Java 5 runtime that is bundled with the Windows and RPM versions of Wildfire.
- The lib directory contains libraries necessary for running Wildfire.
- The plugins directory contains server plugins. By default, Wildfire ships with a web-based admin console plugin.
- The resources/database directory contains SQL schema files to create new Wildfire databases, as well as upgrade scripts for existing installations.
- The resources/security directory is where Wildfire maintains keystores to support SSL connection security.
- The documentation directory contains server documentation.
Setup the Database
Wildfire can store its data in an embedded database or you can choose to use an external database such as MySQL or Oracle. If you would like to use an external database, you must prepare it before proceeding with installation. View the database setup documentation for more information.
Setup the Server
A web-based, "wizard" driven setup and configuration tool is built into Wildfire. Simply launch Wildfire (platform-specific instructions below) and use a web browser to connect to the admin console. The default port for the web-based admin console is 9090. If you are on the same machine as Wildfire, the following URL will usually work: http://127.0.0.1:9090.
Admin Console
After completing the above steps, Wildfire will be configured
and you can use the web-based admin console to administer
the server. The URL should be the same as you used to setup the server
unless you changed the port during the setup.
Running Wildfire in Windows
If you used the Wildfire installer, a shortcut for starting the a graphical launcher is provided in your Start Menu. Otherwise, run wildfire.exe in the bin/ directory of your Wildfire installation. A button on the on the launcher allows you to automatically open your web browser to the correct URL to finish setting up the server:
Windows Service
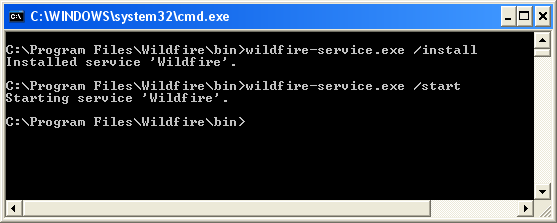
If you're running Wildfire on Windows, you will likely want to run Wildfire as a standard Windows service after initial setup. If you used the Windows installer, a wildfire-service.exe file will be in the bin directory of the installation. You can use this executable to install and control the Wildfire service.
From a console window, you can run the following commands:- wildfire-service /install -- installs the service.
- wildfire-service /uninstall -- uninstalls the service.
- wildfire-service /start -- starts the service
- wildfire-service /stop -- stops the service.
You can also use the Services tool in the Windows Control Panel to start and stop the service.
Note: the graphical launcher is not compatible with the Windows service at this time. If you install the service, you should use service controls as described above to control the server rather than the graphical launcher.
Custom Parameters
Advanced users may wish to pass in parameters to the Java virtual machine (VM) to customize the runtime environment of Wildfire. You can do this by creating vmoptions files in the bin/ directory of your Wildfire installation. For the Windows service, you'd create a new text file called wildfire-service.vmoptions. Each parameter to the VM should be on a new line of the file. For example, to set the minimum heap size to 512 MB and max VM heap size to 1024 MB, you'd use:
-Xms512m
-Xmx1024m
To create parameters for the normal launcher, create a file called wildfired.vmoptions (since the wildfire.exe launcher invokes the wildfired.exe executable to actually start the server).
Running Wildfire in Linux/Unix
You can start and stop Wildfire using the bin/wildfire script in your Wildfire installation:
# ./wildfire
Usage: ./wildfire {start|stop}
# ./wildfire start
Starting wildfire
- redhat-postinstall.sh -- automatically installs Wildfire as a service on Red Hat. It does so by creating a "jive" user and then copying the wildfired script to your init.d directory. This script must be run as root. Please see the comments in the script for additional information.
- wildfired -- script to run Wildfire as a service. You must manually configure this script. See the comments in the script for additional details.